Заглавная страница Избранные статьи Случайная статья Познавательные статьи Новые добавления Обратная связь FAQ Написать работу КАТЕГОРИИ: ТОП 10 на сайте Приготовление дезинфицирующих растворов различной концентрацииТехника нижней прямой подачи мяча. Франко-прусская война (причины и последствия) Организация работы процедурного кабинета Смысловое и механическое запоминание, их место и роль в усвоении знаний Коммуникативные барьеры и пути их преодоления Обработка изделий медицинского назначения многократного применения Образцы текста публицистического стиля Четыре типа изменения баланса Задачи с ответами для Всероссийской олимпиады по праву 
Мы поможем в написании ваших работ! ЗНАЕТЕ ЛИ ВЫ?
Влияние общества на человека
Приготовление дезинфицирующих растворов различной концентрации Практические работы по географии для 6 класса Организация работы процедурного кабинета Изменения в неживой природе осенью Уборка процедурного кабинета Сольфеджио. Все правила по сольфеджио Балочные системы. Определение реакций опор и моментов защемления |
Starter motor turns, but engine does not turnСодержание книги
Поиск на нашем сайте • Faulty starter clutch • Damaged reduction gear • Damaged starter driven gear • Damaged or faulty starter motor pinion gear
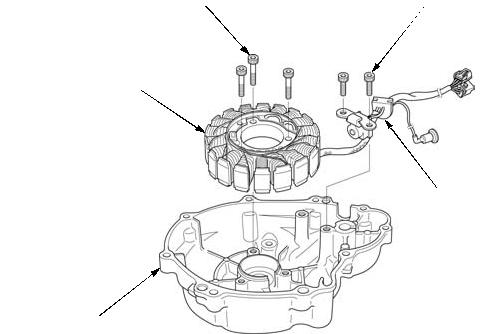
COMPONENT LOCATION
128 N·m (13.1 kgf·m, 94 lbf·ft)
13-2 ALTERNATOR/STARTER CLUTCH
LEFT CRANKCASE COVER
REMOVAL
Drain the engine oil (page 3-9).
Remove the following:
– Left side cover (page 2-3) – Drive sprocket cover (page 2-6) – Gearshift pedal (page 12-14)
Disconnect the following:
– Alternator 3P connector [1] – CKP sensor/neutral switch 3P (Black) connector [2]
Release the alternator wire [3] from the clamp [4].
Disconnect the neutral switch connector [1] and release the wire from the left crankcase cover groove.
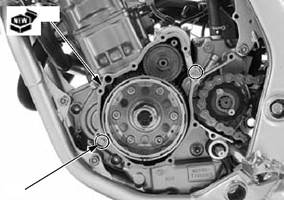
The left crankcase Loosen the left crankcase cover bolts [2] in a crisscross cover (stator) is pattern in 2 or 3 steps and remove the bolts and left
magnetically crankcase cover [3]. attracted to the flywheel, be careful during removal.
Remove the dowel pins [1] and gasket [2].
INSTALLATION
Be careful not to Clean any gasket material from the mating surfaces of damage the mating the left crankcase and cover. surfaces. Install the dowel pins [1] and a new gasket [2].
[1] [3]
[2]
[2]
[3]
[2]
[1]
[1]
[4]
[1]
13-3 ALTERNATOR/STARTER CLUTCH
The left crankcase cover (stator) is magnetically attracted to the flywheel, be careful during installation.
Install the left crankcase cover [1] and bolts [2]. Tighten the bolts in a crisscross pattern in 2 or 3 steps.
Connect the neutral switch connector [3] and set the wire into the left crankcase cover groove.
Connect the following:
– Alternator 3P connector [1] – CKP sensor/neutral switch 3P (Black) connector [2]
Secure the alternator wire [3] with the clamp [4]. Install the following: – Gearshift pedal (page 12-17) – Drive sprocket cover (page 2-6) – Left side cover (page 2-3)
Fill the engine with the recommended engine oil (page 3-9).
[2]
[1] [3]
STATOR/CKP SENSOR
REMOVAL/INSTALLATION
Remove and install the stator/CKP sensor as following illustration.
• Apply locking agent to the CKP sensor mounting bolt threads as specified (page 1-12).
• Apply sealant to the alternator/CKP sensor wire grommet sealing surface (page 1-15).
STATOR/CKP SENSOR
GROMMET
LEFT CRANKCASE COVER
13-4 ALTERNATOR/STARTER CLUTCH
FLYWHEEL
REMOVAL
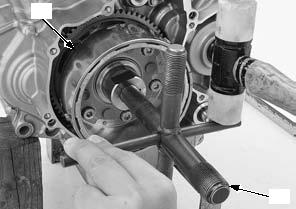
Remove the left crankcase cover (page 13-3). Remove the starter reduction gear [1] and shaft [2].
Hold the flywheel with the special tool and remove the flywheel bolt [1] and washer [2].
Remove the flywheel [1] using the special tool.
Remove the needle bearing [1].
Be careful not to Remove the woodruff key [2]. damage the key groove and crankshaft.
[1]
[2]
[1]
[2]
[2]
[1]
13-5 ALTERNATOR/STARTER CLUTCH
INSPECTION
Inspect the following parts for scratch, damage, abnormal wear and deformation. Replace if necessary.
– Starter reduction gear shaft – Starter reduction gear – Woodruff key – Needle bearing
INSTALLATION
Apply molybdenum oil solution to the needle bearing [1] rotating area.
Install the needle bearing onto the crankshaft. Clean any oil from the crankshaft taper surface.
Be careful not to Install the woodruff key [2] onto the crankshaft. damage the key groove and crankshaft.
Install the flywheel while aligning the woodruff key on the crankshaft with flywheel keyway.
Apply engine oil to the flywheel bolt [1] threads and seating surface.
Install the washer [2] and bolt.
Hold the flywheel with a special tool and tighten the bolt to the specified torque.
TORQUE:128 N·m (13.1 kgf·m, 94 lbf·ft)
[3]
[2]
Align
[2]
13-6 ALTERNATOR/STARTER CLUTCH
Apply molybdenum oil solution to the starter reduction gear shaft [1] outer surface and starter reduction gear [2] inner surface.
Install the shaft and starter reduction gear. Install the left crankcase cover (page 13-3).
STARTER CLUTCH
REMOVAL
Remove the flywheel (page 13-5).
Make sure that the starter driven gear [1] turns counterclockwise smoothly and does not turn clockwise.
Remove the starter driven gear while turning it counterclockwise.
Remove the starter clutch outer and starter one-way clutch.
INSPECTION
Inspect the following parts for scratch, damage, abnormal wear and deformation. Replace if necessary.
– Starter driven gear
Measure each part according to ALTERNATOR/ STARTER CLUTCH SPECIFICATIONS (page 1-7). Replace any part if it is out of service limit.
[2]
[1]
[1]
[1]
13-7 ALTERNATOR/STARTER CLUTCH
INSTALLATION
STARTER DRIVEN GEAR
STARTER CLUTCH OUTER
STARTER ONE-WAY CLUTCH
FLYWHEEL
30 N·m (3.1 kgf·m, 22 lbf·ft)
[2]
TORQUE:30 N·m (3.1 kgf·m, 22 lbf·ft)
[2]
13-8 ALTERNATOR/STARTER CLUTCH
Apply engine oil to the starter driven gear [1] sliding surface.
Install the starter driven gear while turning it counterclockwise.
[1]
Make sure that the starter driven gear turns counterclockwise smoothly and does not turn clockwise.
Install the flywheel (page 13-6).
13-9
|
|||||||||||||||||||||||||||||||||||||||||||||||||||||||||||||||||||||||||||||||||||||||||||||||||||||||||||||||||||||||||||||||||||||||||||||||||||||||||||||||||||||||||||||||||
|
|
Последнее изменение этой страницы: 2016-04-08; просмотров: 486; Нарушение авторского права страницы; Мы поможем в написании вашей работы! infopedia.su Все материалы представленные на сайте исключительно с целью ознакомления читателями и не преследуют коммерческих целей или нарушение авторских прав. Обратная связь - 216.73.216.192 (0.006 с.) |


 [2]
[2]